
Deployment & Suture Management
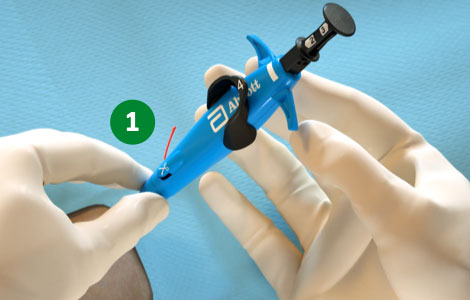
Device Preparation
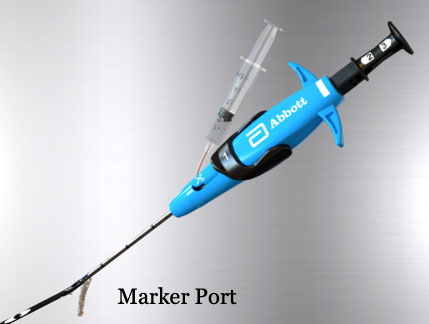 |
To prep the device, verify Marker Lumen patency by flushing it with saline until saline exits the Marker Port. |
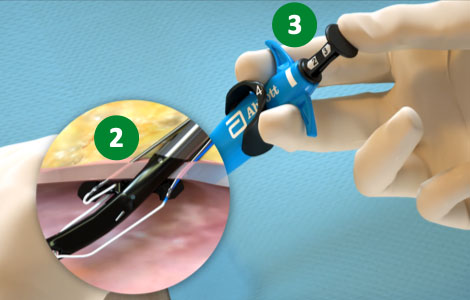
4 Key Steps to Suture Deployment
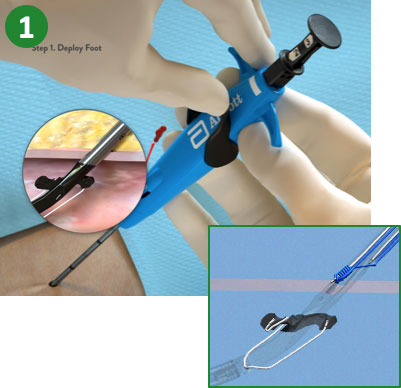 |
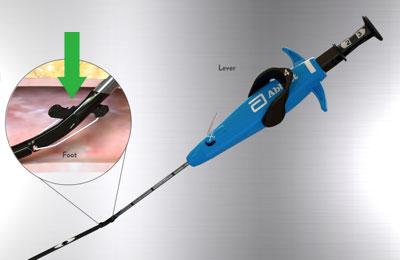
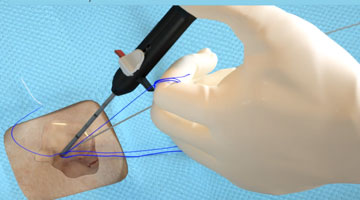
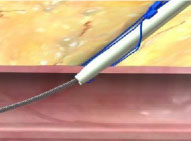
1. Advance device & lift Lever (Open Foot) |
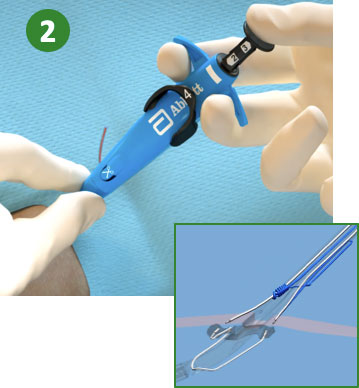 |
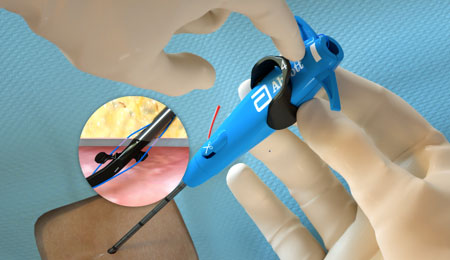
2. Maintain retraction and depress Plunger (Deploy Needles) |
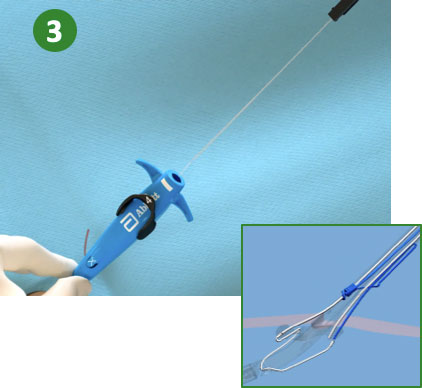 |
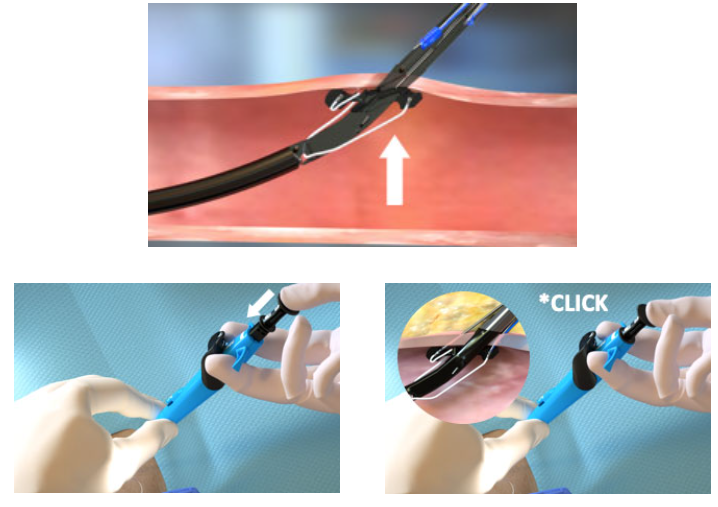
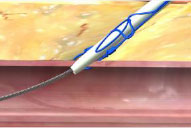
3. Pull back Plunger (Deploy Suture) |
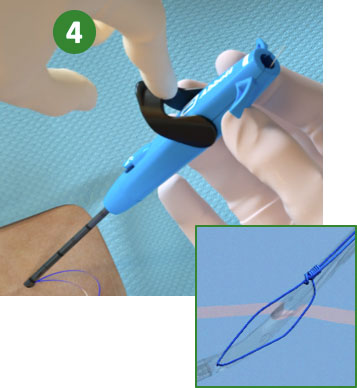 |
4. Lower Lever (Close Foot) |
Suture Management
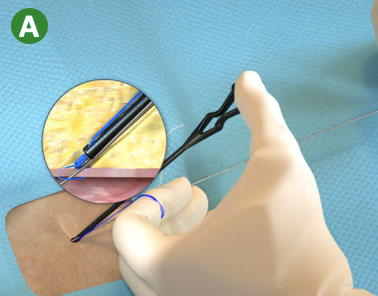 |
A. Load the blue (rail) suture limb in the Snared Knot Pusher (or in the Suture Trimmer) and advance the Suture Knot |
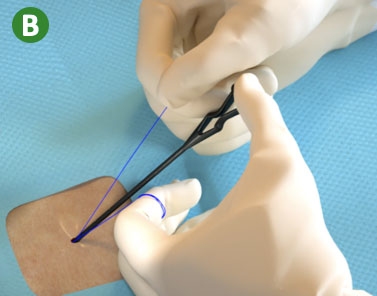 |
B. Lock Suture Knot by pulling white (non-rail) suture limb |
 |
C. Trim suture limbs by pulling Trimming Lever |
Single and Multiple Device Deployment
View the animation library for System Overview, Device Preparation, and full deployment steps for Single Device Deployment and Multiple Device Deployment techniques.
Single Device Deployment |
Multiple Device Deployment
|
Single and Multiple Device Deployment
Foot Break
Causes/Observations
 |
Potential causes during Plunger deployment (Step 2)
Potential observations after Plunger removal (Step 3) and/or device removal
|
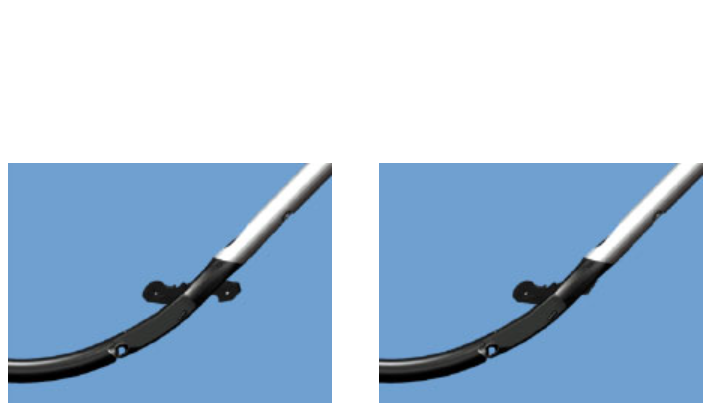
Deployment Angle During plunger deployment (Step 2)
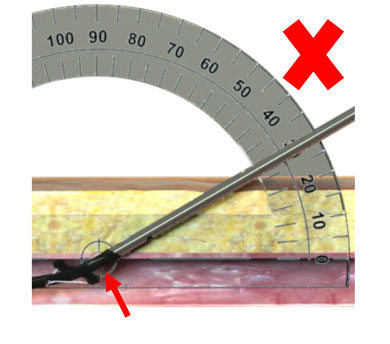 |
 Shallow Deployment Angle Shallow Deployment Angle
|
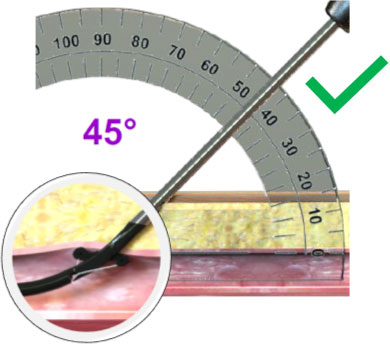 |
 45º Deployment Angle 45º Deployment Angle
|
Foot Break Prevention
  |
|
Foot Break Prevention
  |
Before attempting to remove the device:
|
Device Entrapment
Observations
Difficult or unable to lower the Lever (close the Foot) and remove device after the Suture Deployment
Causes & Prevention
| Potential Causes | Prevention |
|---|---|
|
|
|
|
|
|
|
|
|
|
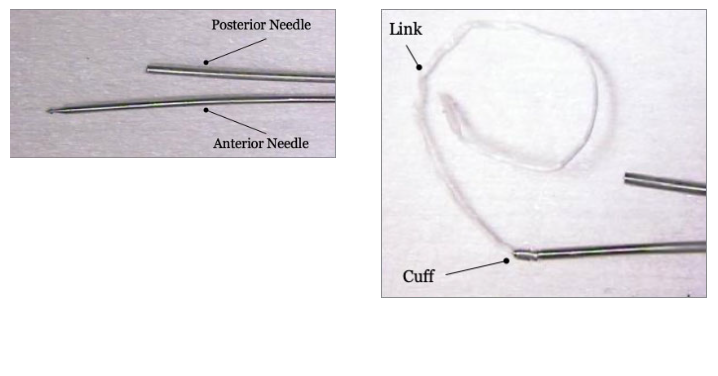
Cuff Miss
 |
|
 |
Prevention
|
Suture Break
Causes/Prevention
 |
|
 |
|
 |
|
Poor Flow
Poor Arterial Flow / No Flow
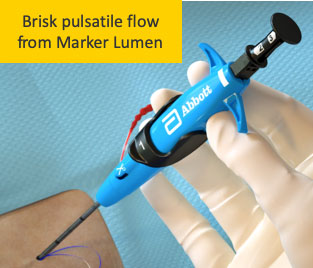  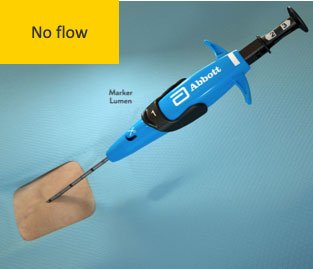 |
Resolution
Marker Port against vessel wall
Side wall stick
Low blood pressure
Clot or tissue plugging Marker Port
Device not in vessel lumen
|
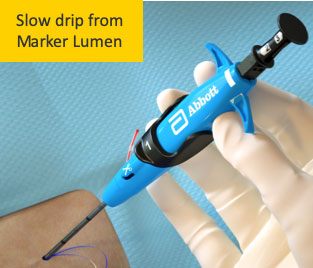
Poor Venous Flow / No Flow
  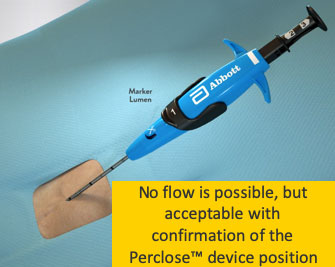 |
Resolution No flow is possible and acceptable if device location is confirmed
Marker Port against vessel wall
Side wall stick
Low blood pressure
Clot or tissue plugging Marker Port
Device not in vessel lumen
|
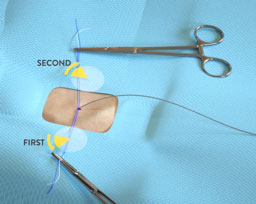
Lack of Hemostasis
Lack of hemostasis may be a result of incorrect order of knot advancement or tangled sutures.
Lack of hemostasis may be a result of incorrect order of knot advancement or tangled sutures.
Incorrect Order of Knot Advancement
 |
|
  Tangled Sutures |
|
 |
|
 |
|
 |

Resultados del Estudio XIENCE 28 y XIENCE 906
Stent XIENCE™ con DAPT a corto plazo: Eventos isquémicos
Entre los pacientes con alto riesgo de sangrado (HBR), el stent XIENCE™ con DAPT de 1 o 3 meses redujo el sangrado grave sin aumento en los eventos isquémicos, incluido el infarto de miocardio (IM) y todas las muertes.6
XIENCE 28: DAPT de 1 mes en pacientes con alto riesgo de sangrado (HBR)
XIENCE 28: Todas las muertes o IM
XIENCE 90: DAPT de 1 mes en Pacientes con alto riesgo de sangrado (HBR)
XIENCE 90: Todas las muertes o IM
Stent XIENCE™ con DAPT a corto plazo: Reducción del sangrado severo
En la misma población de pacientes con alto riesgo de sangrado (HBR), el stent XIENCE™ con DAPT de 1 o 3 meses redujo el sangrado severo sin aumento en los eventos isquémicos.6,*
XIENCE 28: Sangrado BARC 3-5
XIENCE 90: Sangrado BARC 3-5
*El análisis estratificado por puntaje de propensión para el sangrado BARC 3-5 no fue preespecificado. BARC 2-5 fue un criterio de evaluación secundario reforzado para su significación estadística. En ambos estudios, para BARC 2-5, el stent XIENCE™ mostró una tasa de sangrado numéricamente menor para DAPT de 1 o 3 meses frente a una DAPT de 6 meses o DAPT de 12 meses, respectivamente.
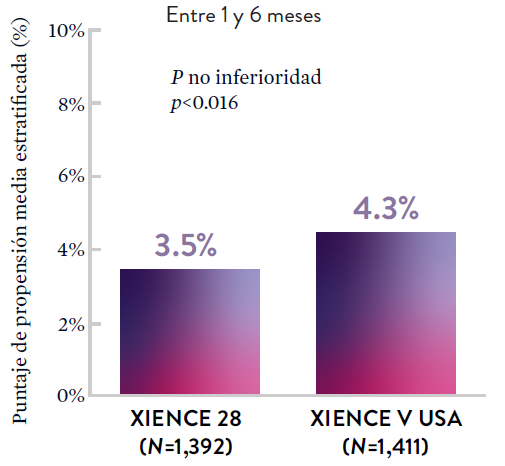
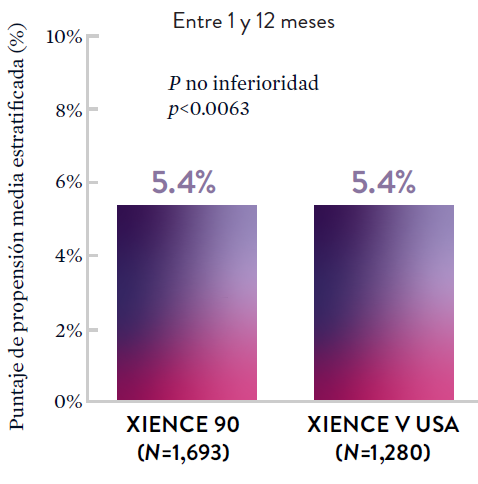
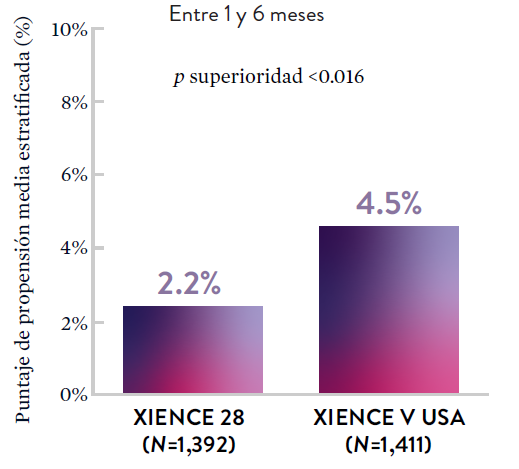
Stent XIENCE™ con DAPT a corto plazo: Baja tasa continua de trombosis del stent
El stent XIENCE™ es reconocido por sus tasas bajas de trombosis del stent (ST), y es significativamente más tromborresistente que otros DES.7 Esto es evidente, incluso con datos de DAPT a corto plazo. El stent XIENCE™ con DAPT de 1 mes no mostró aumento en la ST frente a una DAPT de 6 meses, con una tasa de ST de 0.3%. De manera similar, el DAPT de 3 meses mostró una tasa de ST de 0.2%.6
XIENCE 28: Trombosis del stent (ST)
Entre 1 y 6 meses
ARC: ST Definitiva/Probable
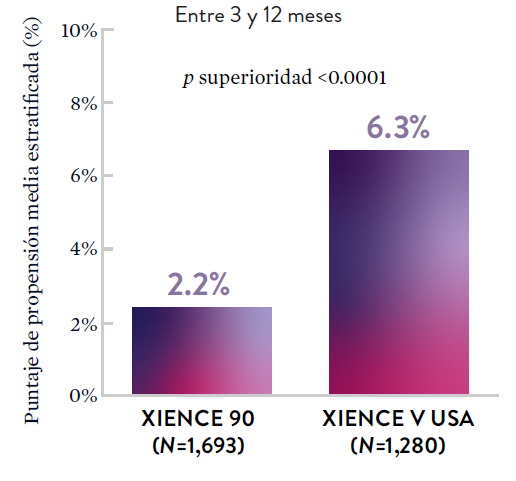
El stent XIENCE™ con DAPT corto muestra tasas consistentemente bajas de trombosis del stent: DAPT de 1 y 6 meses son ambos de 0,3% ST, y DAPT de 3 y 12 meses son ambos de 0,2% ST.XIENCE 90: Trombosis del stent (ST)
Entre 3 y 12 meses
ARC: ST Definitiva/Probable
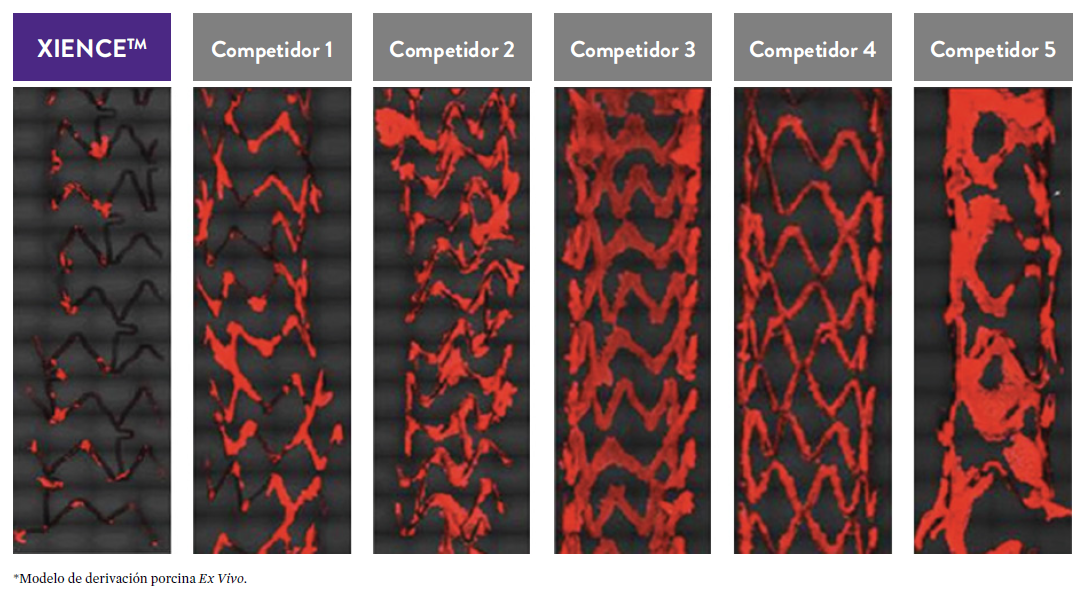
El stent XIENCE™ con DAPT corto muestra tasas consistentemente bajas de trombosis del stent: DAPT de 1 y 6 meses son ambos de 0,3% ST, y DAPT de 3 y 12 meses son ambos de 0,2% ST.El stent XIENCE™ es tromborresistente: Adecuado para la DAPT a corto plazo
El stent XIENCE™ también es reconocido por ser significativamente más tromborresistente que otros DES disponibles en el mercado. Como muestran los hallazgos del estudio, el stent XIENCE™ muestra significativamente menor adhesión plaquetaria (p<0.01) en comparación con otros DES — como se muestra en rojo en las imágenes de microscopía confocal. La adhesión plaquetaria es un factor importante en la trombosis del stent.*8 Estos hallazgos sugieren que esta elección de stent "puede ser idealmente adecuada para DAPT a muy corto plazo".8
*Modelo de desviación ex-vivo en cerdos.
Estudios STOPDAPT: DAPT de 1 mes y 3 meses en una población general9,10
STOPDAPT9 y STOPDAPT 210 fueron ensayos prospectivos del stent XIENCE™ que estudiaron la interrupción de la DAPT a los 3 meses y 1 mes, respectivamente.
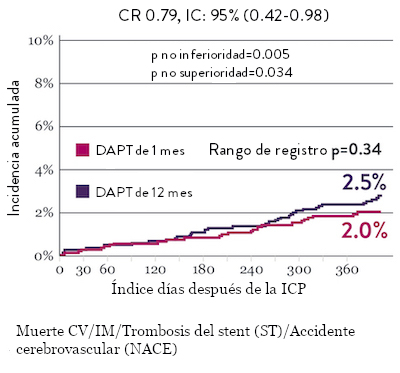
Ensayo STOPDAPT 2: DAPT de 1 mes superior a la DAPT de 12 meses10
El ensayo STOPDAPT 2 reveló que la DAPT de 1 mes demostró seguridad superior a la DAPT de 12 meses, para el criterio de valoración principal de eventos cardiovasculares adversos netos (NACE, por sus siglas en inglés). El NACE incluyó muerte cardiovascular, infarto de miocardio (IM), trombosis del stent (ST) definitiva, accidente cerebrovascular o hemorragia mayor/menor de trombosis en infarto al miocardio (TIMI, por sus siglas en inglés). Los 3,009 pacientes de este ensayo controlado y aleatorizado fueron tratados con el stent XIENCE™.10
NACE* significativamente menor con DAPT de 1 mes

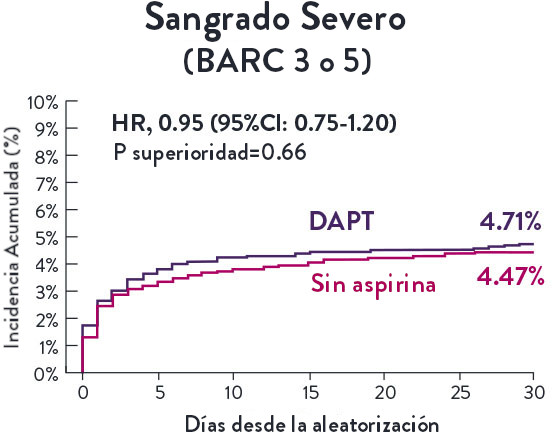
Sangrado significativamente menor* con DAPT de 1 Mes
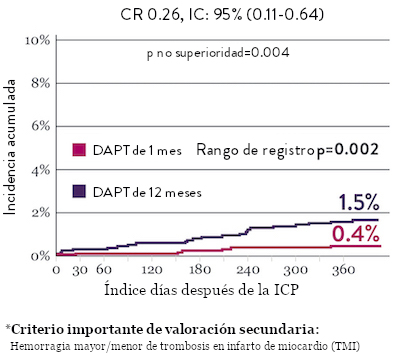
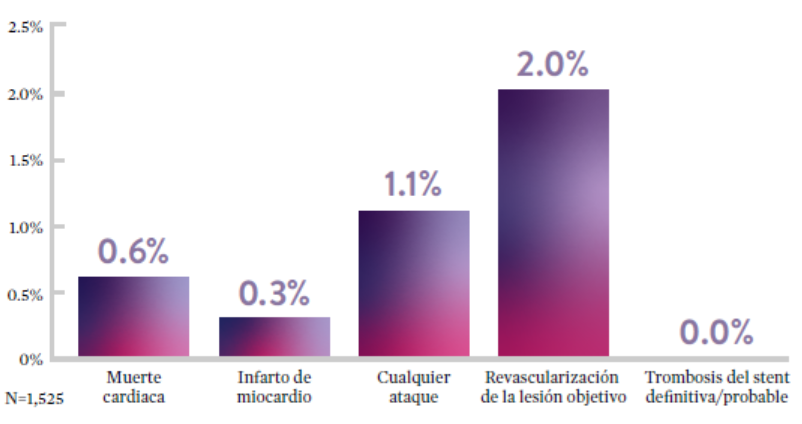
Tasas de eventos isquémicos comparables* con DAPT de 1 mes

Diseño y aleatorización del Ensayo STOPDAPT 210

DAPT corto de 1 mes
- 0 a 1-mes: Aspirina + P2Y12
- Después de 1 mes: Monoterapia con clopidogrel

DAPT de 12 meses
- 0 a 1 mes: Aspirina + P2Y12
- 1 a 12 meses: Aspirina + Clopidogrel
- 12 a 60 meses: Monoterapia con aspirina

- Intervención coronaria percutánea (ICP) exitosa utilizando un stent liberador de everolimus de cobalto-cromo: XIENCE™
- Candidato para DAPT (aspirina/inhibidor del receptor P2Y12) durante 1 año

- Pacientes que necesitan anticoagulantes orales
- Historial de hemorragia intracraneal
- Complicaciones importantes en el hospital (IM/accidente cerebrovascular/hemorragia mayor)
Ensayo STOPDAPT: La combinación del stent XIENCE™ con DAPT de 3 meses es factible9
STOPDAPT9 fue el primer ensayo prospectivo que estudió la interrupción de la DAPT a los 3 meses después de la implantación. Entre otros resultados a 1 año, la tasa de trombosis de stent con XIENCE™ fue de 0.0%.
El ensayo STOPDAPT demuestra la factibilidad de usar el stent XIENCE™ con DAPT de 3 meses9
STOPDAPT-3 Trial Design and Randomization11

- ICP con uso exclusivo y planificado de un stent liberador de everolimus (EES, por sus siglas en inglés ) de CoCr (XIENCE™)
- Presencia de paro cardíaco súbito (SCA, por sus siglas en inglés) o ARC-HBR
- Elegible para DAPT (aspirina/inhibidor P2Y12) durante 1 mes.
Diseño del estudio y aleatorización
Grupo 1:
0 a 1 mes: Aspirina + P2Y12 (Prasugrel)
Después de 1 mes: Monoterapia con clopidogrel
Grupo 2:
0 a 1 mes: P2Y12 (Prasugrel)
Después de 1 mes: Monoterapia con clopidogrel
El Ensayo STOPDAPT-311 se diseñó para estudiar la DAPT de 0 meses* (SAPT˄ utilizando solamente un inhibidor P2Y12) para pacientes con paro cardiaco súbito (SCA) y alto riesgo de sangrado (HBR).
Aunque los resultados son comparables tanto para hemorragias como para eventos isquémicos en los brazos de DAPT y TAPS, el estudio no cumplió con su criterio de valoración y concluyó en usar DAPT durante 1 mes después de la ICP.

El stent XIENCE™ sigue siendo el ÚNICO DES con la indicación de DAPT más corta, que puede ser tan corta como 28 días.12
MAT-XXXXXXX